Technical Knowledge
How to use the laser leveling machine? How many steps?
April 23, 2023
How to use the laser leveling machine? How many steps?
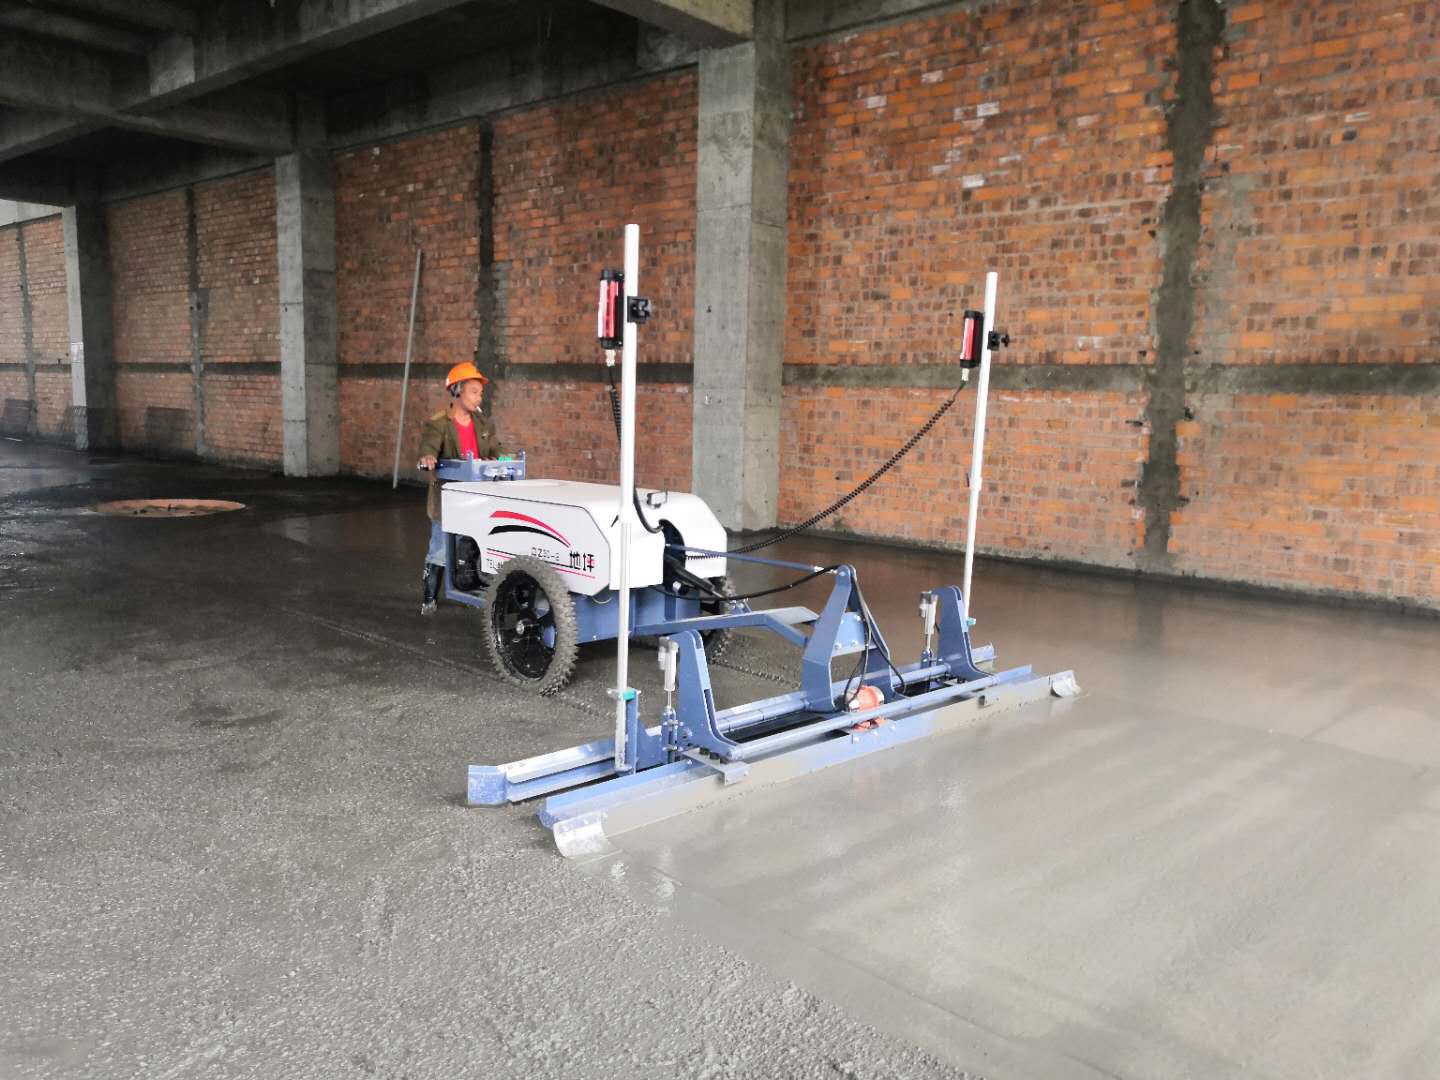
The laser leveling machine manufacturer will introduce to you what to do with the equipment: check the equipment before using it to ensure that all functions of the equipment are normal, and adjust the reference point of the laser before it can be used , After paving, technicians are required to evaluate the ground, and it is completed only after the flatness is determined.
1. Preparation
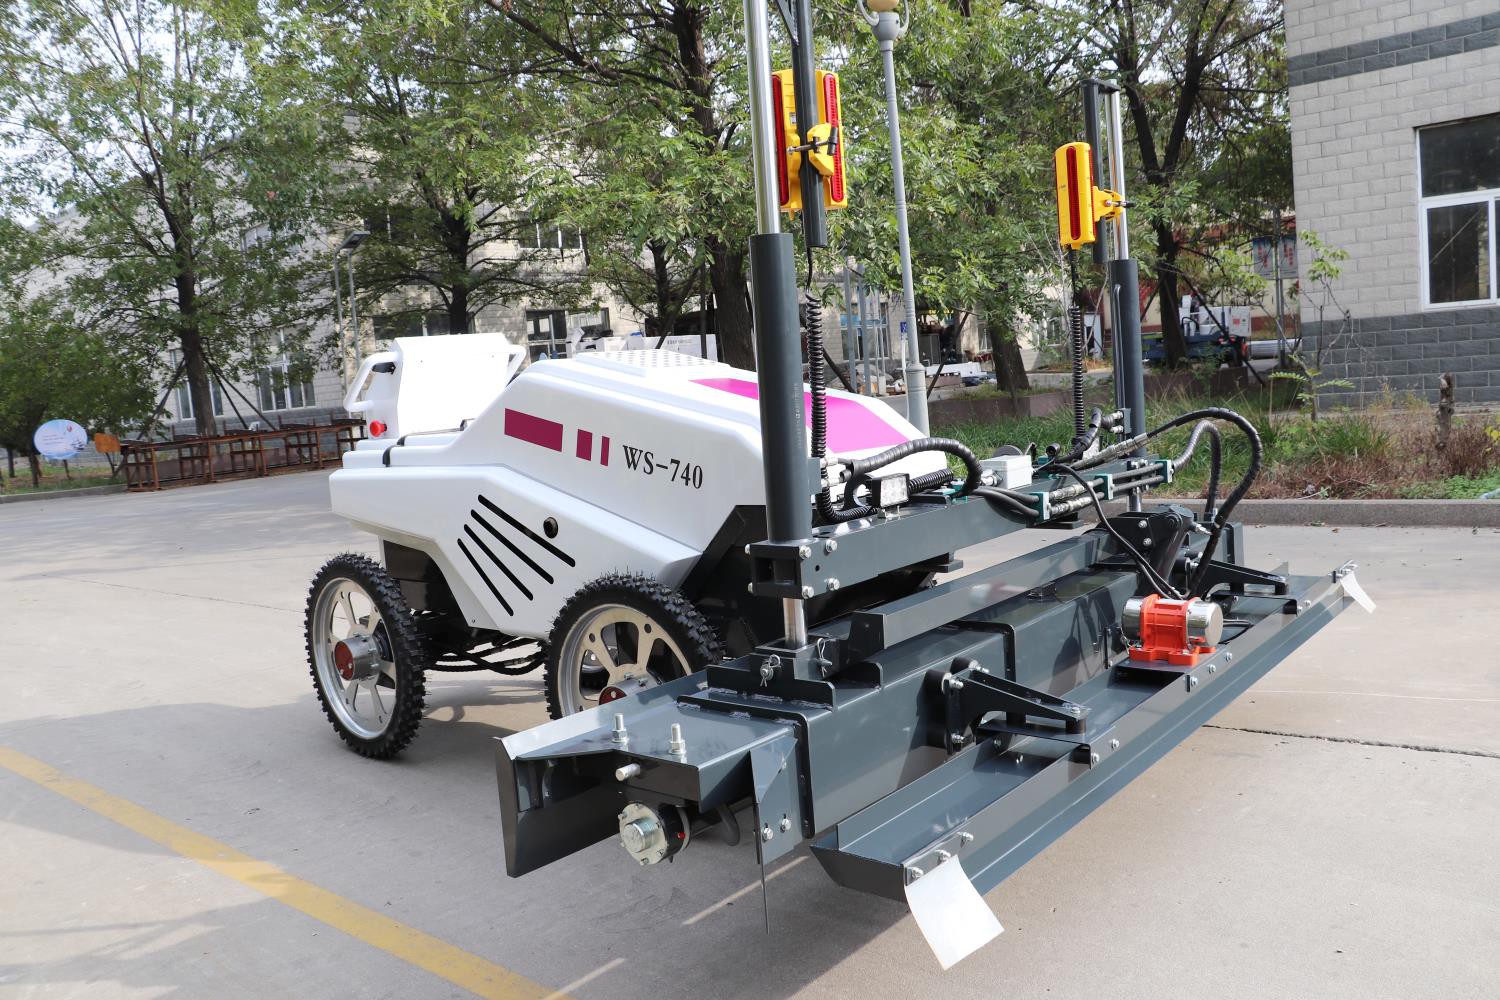
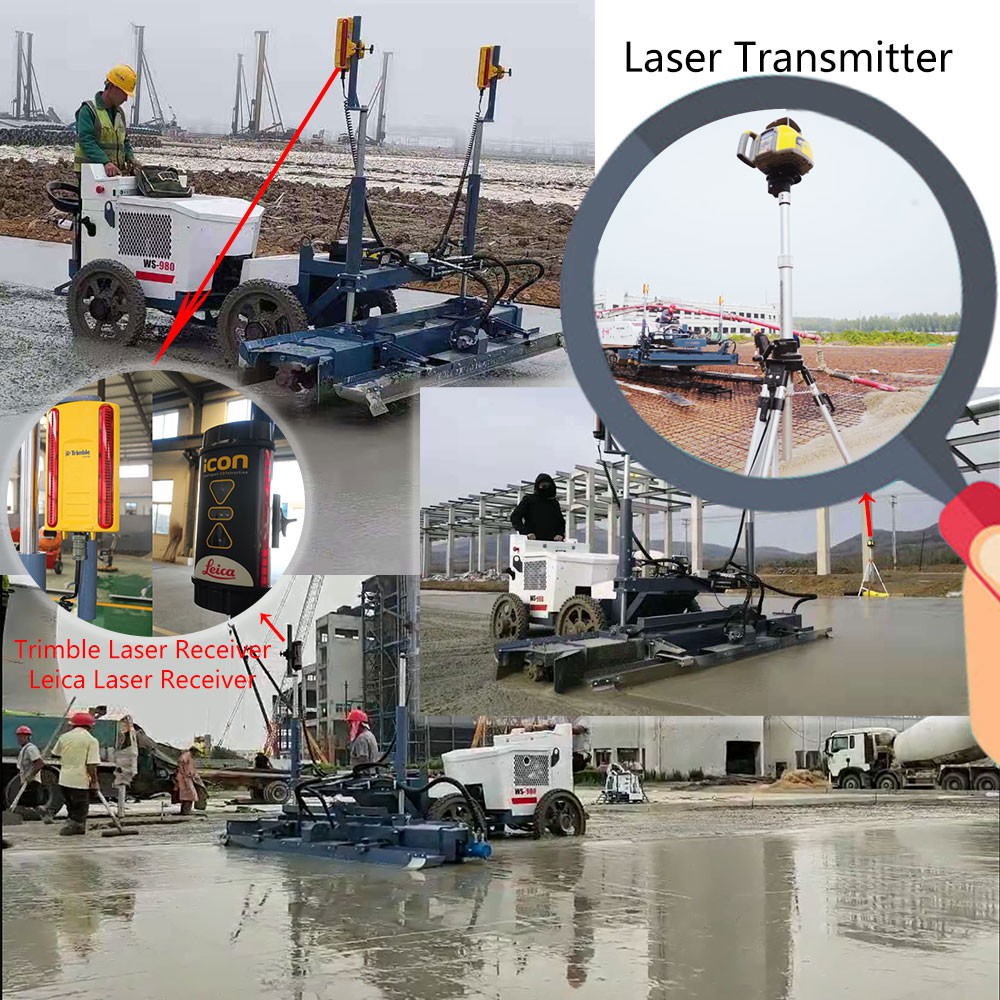
(1) After the base layer is processed, the equipment of the laser paver is debugged, and the fixed reference level point is drawn according to the original level point; the non-woven fabric is laid, the side formwork is supported, the laser transmitter is erected, and the ground is ground according to the original level point. The elevation is introduced into the laser leveling machine.
(2) Conveying concrete
Commercial concrete is used, and the commercial concrete is transported to the entrance and exit of the garage by tank truck, and then transported to the construction site by a three-wheel dump truck.
(3) Standardization and verification
Use a hand-held laser receiver to check the elevation of the floor, introduce the elevation into the laser paver, and adjust the reference point (±0.00) on the leveling machine.
2. Concrete paving
Pouring steps:
(1) After the formwork is supported, the warehouse should be cleaned and soaked with water one day in advance before pouring concrete. When pouring is approaching, drain the open water and sweep the cement slurry or interface agent. At this time, no obvious water accumulation is strictly prohibited. If there is, it must be resolutely removed before paving concrete.
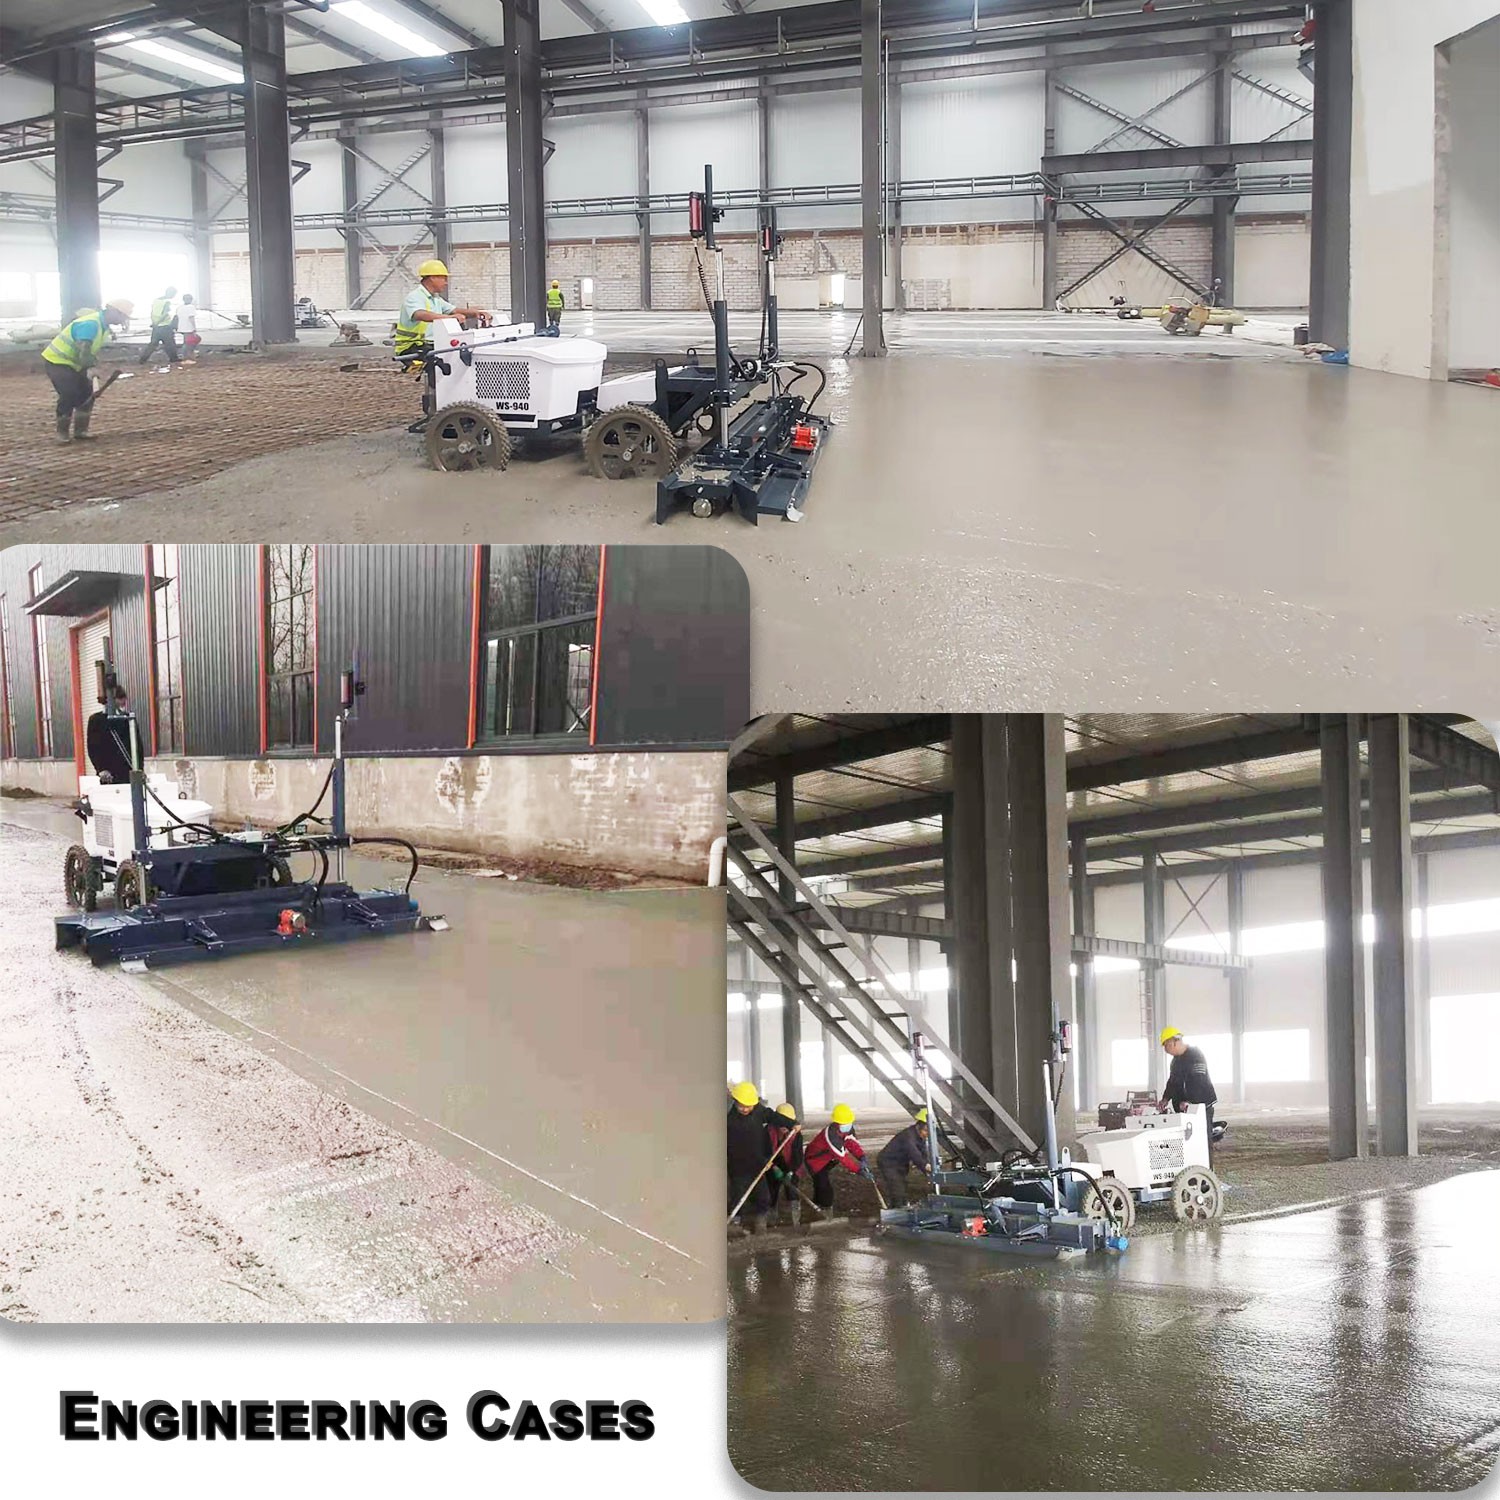
(2) After the concrete is put down, it should be preliminarily leveled, and the leveling height should be 3 cm thicker than the elevation. Then level it with a laser paver. The corners that cannot be leveled can be leveled with a gasoline leveler or manually.
(3) When the warehouse near the wall is being poured, after the leveling machine walks over, it must be leveled with a scraper in time. and so on.
(4) For areas where concrete mixer trucks cannot be driven to the site, tractors should be used to transfer concrete. After the pouring is completed, the floor finishing construction begins when the concrete is initially set.
(5) When the warehouse near the wall is pouring, after the leveling machine walks over, it must be scraped with a scraper in time. and so on.
(6) For areas where concrete mixer trucks cannot be driven to the site, tractors should be used to transfer concrete. After the pouring is completed, the floor finishing construction begins when the concrete is initially set.
3. During construction, the laser signal received by the receiver of the laser paver (frequency of 10 times per second) automatically adjusts the elevation in real time to ensure that the construction elevation is always at the set standard. Because the laser transmitter is fixed after being set up, it can ensure that the construction of a large area of ground does not produce cumulative errors.
4. During the construction, the operator uses a hand-held laser receiver to detect the ground after the machine is constructed, and again ensures that the flatness error is within the controllable range.
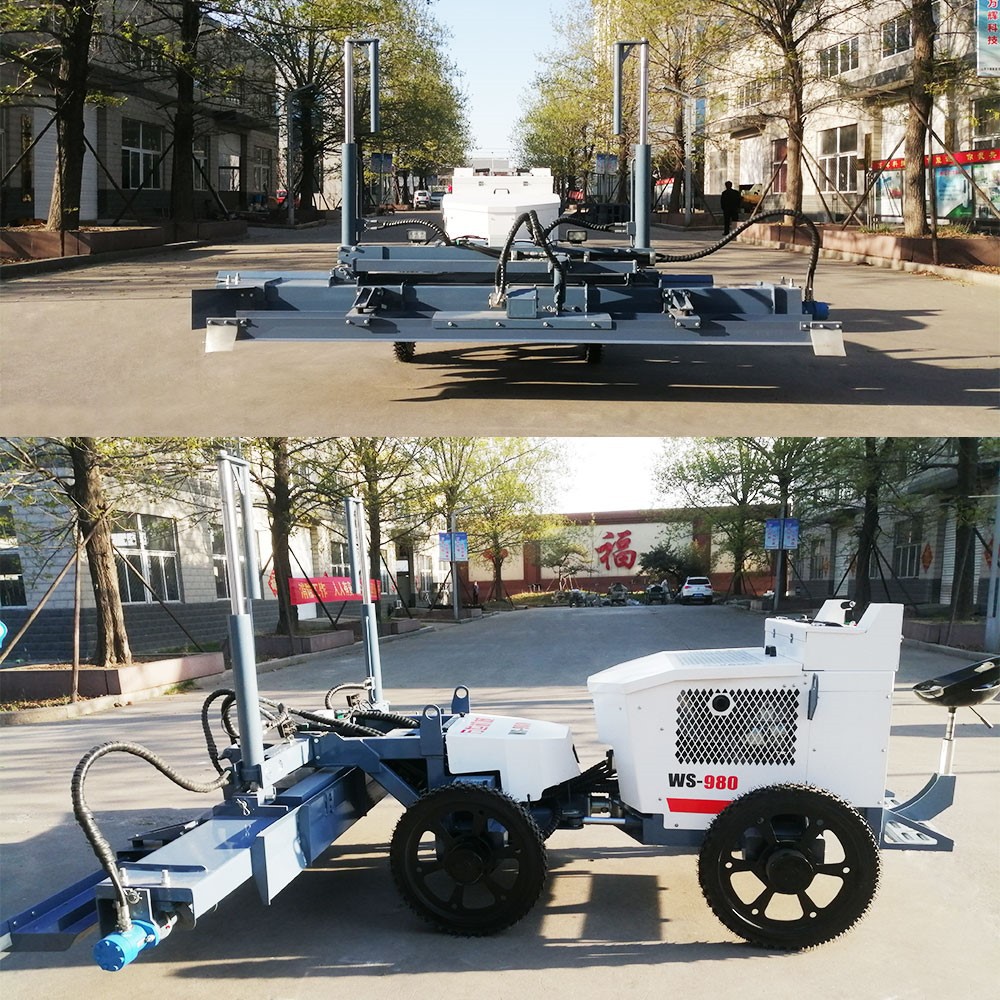
A complete and perfect brand of course needs good word-of-mouth from local users, and the establishment of word-of-mouth requires long-term accumulation. If you want to be a good company, you must be responsible for customers and think about customers, and bring profits to customers better. This is the most important thing.
Thanks to All the Friends Who Support and Trust Shandong Vanse Machinery Technology Co., Ltd.
If you want to know more about Shandong Vanse Machinery Technology Co., Ltd. or have any questions, please feel free to contact us:
Our Factory
Shandong Vanse Machinery Technology Co., Ltd.


About the Author: Shandong Vanse Machinery Technology Co., Ltd.

Shandong Vanse Machinery Technology Co., Ltd. is a high-tech manufacturer specializing in concrete construction machinery, including laser screeds and related equipment. The company integrates R&D, production, and global sales, with products exported to over 60 countries and widely used in infrastructure projects worldwide.

Shandong Vanse Machinery
Leading manufacturer specializing in high-performance concrete laser screeds, telescopic arm flatwork handlers, and mechanical ride-on power trowels.
Post overview
Main PRODUCT Categories
Need Machine Guidance?
Speak directly with Shandong Vanse field specialists for tailored equipment quotes and site planning.
Contact Us TodayRelated Articles
You Might Also Like
August 12, 2025
Common faults and solutions of the concrete laser leveling machine
Concrete laser levelers are prone to various malfunctions during long-term, high-intensity operations due to wear, improper operation, or inadequate maintenance. Promptly troubleshooting and resolving faults can prevent extended downtime, reduced construction efficiency, and even equipment damage. The following are common fault types, cause analysis, and solutions: The laser system is the core of leveling accuracy, and its failure directly impacts construction quality. Common problems include: Failure Symptoms: Frequent alarms and flickering indicators on the laser receiver, large deviations in leveling accuracy, and inability to automatically level properly. Common Causes: Laser transmitter battery is low, battery contact is poor, or the transmitter is faulty. Laser receiver lens is contaminated (dust, concrete debris), damaged, or has reduced sensitivity. Environmental interference (such as strong direct sunlight, interference from other nearby laser equipment, or obstacles blocking the signal). Laser transmitter is uncalibrated, resulting in leveling accuracy deviation; or the receiver is loosely mounted or misaligned. Solution: Check the laser transmitter battery level and replace with new batteries. Clean the battery contacts to ensure proper contact. If the transmitter is damaged, repair or replace it. Clean the receiver lens with a soft cloth to remove any stains. If the lens is damaged, replace the receiver lens or the entire assembly. Avoid working in bright sunlight, turn off any interfering equipment, and remove any obstructions (such as rebar or formwork) in the signal path. Recalibrate the laser transmitter's level (using a level). Tighten the receiver mounting bolts until they are properly positioned and secure. Symptom: The laser transmitter does not power on, the receiver indicator light is off, and the device cannot enter automatic leveling mode. Common causes: The laser transmitter power switch is damaged, the battery is exhausted, or the battery compartment is poorly connected. The receiver wiring harness is broken, the plug is loose, or the terminal block is oxidized. The laser module fuse in the control system is blown, or the control board is faulty. Solution: Check the transmitter power switch, replace the batteries, and clean the battery compartment. If the switch is damaged, repair or replace the transmitter. Check the receiver wiring harness for damage, reconnect the plug, and clean the terminals (you can wipe with alcohol). Replace any broken wiring harnesses. Check the corresponding fuse in the control box. If it is blown, replace it with a fuse of the same specification. If the fuse repeatedly blows, check for a short circuit and repair or replace the control board if necessary. The hydraulic system is responsible for driving travel, leveling mechanism lifting and lowering, and vibrating. Failure can lead to reduced equipment performance. Common problems are as follows: Failure symptoms: Slow travel speed, inability to raise or lower the leveling baseplate, and decreased vibration frequency. Common causes: The hydraulic oil tank oil level is too low, the hydraulic oil type is incorrect, or the oil is contaminated (air, moisture, or impurities are mixed in). Severe wear of the hydraulic pump, increasing internal leakage; or the hydraulic pump drive belt is slipping or broken. Clogged hydraulic lines and leaking joints lead to pressure loss; or the overflow valve or pressure reducing valve is faulty, causing pressure regulation failure. Aging or damage to the hydraulic cylinder seals can cause internal or external leakage. Solution: Refill with the same type of hydraulic oil to the standard level. If the oil is contaminated, completely replace the hydraulic oil and filter, and clean the oil tank. Check the tension of the hydraulic pump drive belt and replace any slipping or broken belts. If the hydraulic pump is worn, repair or replace it. Check the hydraulic lines, clear any blockages, and replace seals at leaking joints; calibrate or replace faulty relief and pressure-reducing valves. Disassemble the hydraulic cylinder and replace any aging seals. If the cylinder barrel or piston rod is scratched, repair or replace the cylinder. Symptom: The hydraulic oil temperature exceeds 60°C during operation (some equipment may trigger an alarm), accompanied by jerking movements and increased noise. Common Causes: Radiator surface blockage (dust, concrete debris), reducing heat dissipation efficiency; or cooling fan failure (motor damage, broken belt). Excessive hydraulic system pressure, resulting in prolonged overflow of the relief valve and heat generation; or inappropriate hydraulic oil viscosity (using low-viscosity oil in summer and high-viscosity oil in winter). Improper hydraulic piping layout, excessively long or with numerous bends, increasing fluid resistance; or severe internal leakage in hydraulic components, generating excessive heat. Solution: Use a high-pressure water jet to clean the radiator surface and remove any blockages. Inspect the cooling fan and replace any damaged motor or belt to ensure proper fan operation. Recalibrate the relief valve pressure to the standard value (refer to the equipment manual); replace the hydraulic oil with a viscosity appropriate for the ambient temperature. Inspect the hydraulic lines and replace any excessively bent or aged lines. Repair or replace any components, such as the hydraulic pump and cylinder, that are leaking severely. Symptoms: Oil leakage or dripping from hydraulic line joints; a high-frequency whine emanating from the hydraulic pump or lines. Common Causes: Deterioration or damage of joint seals, or loose, undertightened joints. Vibration and friction leading to damage or cracks in the lines; or loosening of the pipe securing clips, causing the lines to shake and collide. Air mixing with the hydraulic oil causes cavitation, leading to abnormal noise in the pump or lines. Solution: Tighten any loose joints and replace any aged seals (such as O-rings or combination gaskets). If the joint threads are damaged, replace the joint. Repair or replace any damaged lines and re-secure any loose pipe clips to prevent vibration and friction. Check the hydraulic oil tank level and add hydraulic oil to remove air. Loosen the hydraulic pump outlet pipe to vent air, or start the machine and run it at no load to vent air until the abnormal noise disappears. The engine is the power source of the machine. Failure can cause the machine to fail to start or interrupt operation. Common problems include: Failure Symptom: The starter motor operates normally, but the engine fails to start; or it stalls automatically within a few seconds after starting. Common Causes: Insufficient fuel supply: Low fuel tank level, clogged fuel filter, or leaking or clogged fuel lines. Intake System Failure: Severely clogged air filter, resulting in insufficient air intake; or air leak in the intake manifold. Ignition System Problem (Gasoline Engine): Carbon deposits on or damage to the spark plug, or a faulty ignition coil. Diesel Engine: Clogged fuel injectors, insufficient injection pressure, or a preheating system malfunction (in low temperatures). Solution: Add fuel and replace any clogged fuel filters. Check the fuel lines, eliminate leaks, and clear any clogged lines. Clean or replace the air filter element; check the intake manifold for tightness and repair leaks. Clean carbon deposits from the spark plugs and replace damaged spark plugs or ignition coils (for gasoline engines). Clean or replace the fuel injectors and calibrate the injection pressure; check the glow plugs or glow controller and repair the glow system (for diesel engines). Symptoms: Metallic knocking and unusual noises are heard during engine operation; insufficient power is present during operation and cannot meet the load requirements. Common Causes: Low oil level or deteriorating oil quality, resulting in poor lubrication and increased component wear (such as unusual noises on bearings and valve tappets). Poor fuel quality, leading to injector blockage, incomplete combustion, detonation, or black smoke. Insufficient cylinder compression pressure (worn piston rings, poor valve seals), or turbocharger malfunction (for supercharged engines). Cooling system malfunction, engine overheating, resulting in power loss. Solution: Replace the engine oil and oil filter, and refill the oil to the standard level. If components are severely worn, disassemble the engine for repair. Replace high-quality fuel, clean the injectors and fuel lines, and add fuel additives to improve combustion. Check cylinder compression pressure, replace worn piston rings, or repair valve seals; repair or replace the turbocharger. Clean the radiator, check the coolant level, and check the water pump to ensure proper operation of the cooling system. Mechanical structures are directly involved in concrete leveling operations, and failures can easily lead to reduced construction quality. Common problems include the following: Symptoms: Grinding or jerking noises during travel; the machine veers off course, or its speed fluctuates. Common Causes: Worn travel drive chain/gears, insufficient tension, or poor chain lubrication. Uneven wear of travel wheels/tracks, or improper track tension (for tracked equipment). Damaged drive shaft bearings or differential failure (for wheeled equipment). Solution: Adjust chain tension and add grease; replace severely worn chains or gears. Check wheel/track wear and replace worn parts; adjust track tension to standard. Replace damaged drive shaft bearings; repair or replace the differential. Symptoms: Vibrator inoperative or insufficient frequency; scraper deformation or lifting and jamming. Common causes: Vibrator motor failure, hydraulic motor failure, or vibrator shaft jam (concrete debris accumulation). Scraper mounting bolts loose, structural deformation, or lift hydraulic cylinder failure. Worn or insufficiently lubricated pins connecting the leveling mechanism to the machine body, causing lifting and jamming. Solution: Clean concrete debris from the vibrator, repair or replace the motor/hydraulic motor; inspect the vibrator shaft and replace worn parts. Tighten scraper bolts and correct deformation of the scraper; repair or replace the lift hydraulic cylinder. Lubricate the connecting pins and replace severely worn pins and bushings. The electrical system control equipment components work together, and malfunctions can easily lead to operational failures. Common problems are as follows: Symptom: No response when the button is pressed, and the indicator light is off, permanently on, or flashing abnormally. Common Causes: Oxidation or damage to the button contacts, or loose or poor contact in the wiring harness connector. Control panel power failure or damage to control panel components (such as burnt relays or capacitors). Corresponding actuator failure (such as solenoid valves or motors), resulting in abnormal control system feedback. Solution: Clean the button contacts and replace damaged buttons; reconnect the wiring harness connector and tighten the terminals. Check the control panel power supply voltage and replace any burned components. If the control panel is damaged, repair or replace it. Investigate the actuator components and replace the faulty solenoid valve or motor. Fault Symptom: After pressing the emergency stop button, the equipment does not shut down immediately, posing a safety hazard. Common Causes: Internal contacts of the emergency stop button are sticking or damaged, or wiring is loose or disconnected. A faulty relay in the emergency stop circuit prevents power from being cut off. Solution: Replace the damaged emergency stop button and reconnect any loose wiring. Inspect the emergency stop circuit relay and repair or replace the faulty relay to ensure proper circuit disconnection. Simple first, then complex: Prioritize easily observable and accessible areas (such as oil level, connectors, and cleanliness), then delve deeper into internal components. Electrical first, then mechanical: If a malfunction occurs, first check the electrical controls (buttons, wiring harness, sensors), then the mechanical and hydraulic components. Use the equipment manual: Refer to the fault code table in the equipment manual (if available) to quickly locate the source of the fault. Strictly adhere to the daily maintenance schedule and regularly clean, lubricate, and inspect key components to prevent minor issues from becoming major problems. Operators must adhere to standardized procedures to avoid overloading and rough handling, minimizing abnormal equipment wear. A fault log should be established to analyze the causes of frequent faults and optimize maintenance cycles or operating procedures. The above methods can quickly resolve common concrete laser leveling faults, ensuring continuous and stable operation and improving construction efficiency and quality. For complex faults (such as engine overhaul or hydraulic pump replacement), it is recommended to contact professional maintenance personnel or manufacturer technical support. ARMOUR JOINT CONCRETE LASER LEVELING MACHINE POWER TROWEL TOPPING SPREADERRead More
October 15, 2025
What are the main differences in operation processes among different types of concrete laser leveling?
The four types of concrete laser leveling machines you mentioned represent typical models with different levels of automation and functionality. The main differences in their operation processes lie in several core links such as equipment positioning, elevation control, travel mode and construction scope. Now let's break down the unique operation process of each model one by one. To understand more intuitively, we can compare their differences in key operation links through the following table: Operation link Walk-behind type Four-wheel drive Four-wheel telescopic arm type Remote-controlled four-wheel telescopic arm type 1. Equipment positioning and movement Manual traction consumes a lot of physical effort from the operator and the movement is not precise. Cab operation, like driving a car, requires moving on a leveled or solid ground. The cab operates the movement, but the flat head is precisely positioned at a distance through the telescopic boom. The remote control operates the movement, allowing the operator to stand at the best observation point. 2. Control of a flat hairstyle The flat head is integrated with the main unit and moves along with it. The flat head is usually fixed at the front or bottom of the fuselage and moves along with the body. The flat head is separated from the main unit and controlled independently by a multi-section telescopic arm. The flat head is separated from the main unit and controlled independently by a multi-section telescopic arm. 3. Elevation and slope control It relies on manual adjustment by the operator and requires extremely high levels of experience and a sense of touch. The laser system automatically controls the elevation of the leveling head and can preset single or double slopes. The laser system automatically controls the elevation and slope of the leveling head, unaffected by the posture of the fuselage. The laser system automatically controls the elevation and slope of the leveling head, unaffected by the posture of the fuselage. 4. Construction scope and flexibility Small-scale construction, low flexibility, prone to leaving footprints that need to be repaired. Large-scale construction is carried out, but there are blind spots near walls and columns, and manual material replenishment is required. It has a wide coverage range, with an arm span of up to 6 to 12 meters, and can handle some blind spots. It has the highest flexibility and can be installed closely against walls and column bases with almost no blind spots. 5. Requirements for operators High skills and high physical strength Driving skills and system operation Driving skills, spatial sense and boom operation techniques Advanced remote control skills and spatial sense, with the lowest physical requirements. Core features: Human-machine integration, with humans serving as the power source and main control system. Typical operation process Installation reference: Set up a rotating laser emitter outside the construction area. Positioning and startup: Place the machine at the starting point of the concrete, install the laser receiver, and turn on the vibration motor. Manual traction and leveling The operator holds the handle with both hands and pulls the machine backward relying on physical strength. Keep your eyes fixed on the laser receiver signal light installed on the mast (or listen to the buzzer), and manually rotate the adjustment rod to adjust the height of the scraper in real time to reach the laser plane. Repetition and shifting: After completing one row, turn off the vibration, lift or drag the equipment to the next row with great effort, overlap with the previous row, and repeat the process. Blind spot handling: Corners and edges that machines cannot handle, which need to be repaired manually with traditional tools. Core features: Operator driving, the leveling system and the walking system are closely integrated. Typical operation process Installation benchmark: The same as above. Driving into position: The operator drives the equipment from a solid ground into the starting point of the construction area. System Settings: Set the slope mode (horizontal, single slope, etc.) on the control panel of the cab. Driving and Automatic Leveling Let go of the crew cut. The operator controls the steering wheel and the accelerator to move the machine forward, backward and turn. The elevation and slope of the flat head are automatically maintained by the laser system and do not require human intervention for leveling. Monitoring and Steering: The operator monitors the instruments and the concrete condition ahead in the cab and turns at the end of each row. The fuselage must be moved to allow the entire flat head to cover the new area. Core features: The flat head is separated from the main unit, and the working range is expanded through the telescopic arm. Typical operation process Installation benchmark: The same as above. Driving and strategic positioning: The operator drives the equipment to a strategic fixed position (usually in the middle or on one side of the area to be poured), after which the machine body no longer needs to be moved frequently. Boom operation and automatic leveling The operator operates the multi-way valve handle or rocker in the cab to control the extension, contraction, lifting, lowering and left and right swinging of the telescopic arm. The laser system automatically controls the elevation and slope of the flattening head. The operator only needs to control the boom to move the leveling head to the position that needs to be leveled. Covering construction: Through the flexible movement of the boom, the flat head can cover a large area in a "fan-shaped" or "net-like" path, while the machine body remains stationary. Core feature: Based on the telescopic arm type, it has achieved remote control with "human-machine separation". Typical operation process Installation benchmark: The same as above. Remote control positioning: The operator holds the remote control to remotely control the movement of the equipment and park it at the optimal fixed position, which can easily avoid ground obstacles and steel mesh. Remote precision operation The operator leaves the cab and stands in a position where the overall situation can be overseen. All the movements of the telescopic arm and the flat head can be precisely controlled through the joystick and buttons on the remote control. Panoramic Monitoring and Construction Due to the excellent field of vision, the operator can simultaneously observe the material condition of the concrete, the leveling effect, and the distance between the boom and the surrounding obstacles. The leveling head can be directed to closely adhere to the formwork, wall base and column base for construction, minimizing blind spots and achieving the most efficient and precise leveling operation. Walk-behind type: Suitable for extremely small, irregular or areas where large equipment such as equipment foundations cannot enter. It has a low cost, but it is the most dependent on people and technology. Four-wheel drive type: Suitable for large, open and barrier-free warehouse and factory floors, its efficiency is much higher than that of the Walk-behind type. It is the main force in traditional large-scale construction. Four-wheel telescopic boom type: Suitable for construction sites of medium complexity, such as those with partial columns or equipment foundations. It reduces the number of movements of the fuselage and improves the coverage efficiency. Remote-controlled four-wheel telescopic boom type: It is the top-of-the-line choice, suitable for the highest standards and most complex construction sites (such as super factories, precision workshops, and projects with a large number of columns and obstacles). It offers unparalleled flexibility, vision and construction quality, minimizing manual repair work to the greatest extent. Which model to choose depends on the scale of your project, the complexity of your layout, your budget, and your requirements for construction efficiency and precision. Note: The parameters provided in this document are for reference only and are not mandatory. Due to differences in technical characteristics between different brands and models of laser levelers, please consult the manufacturer for a suitable solution before actual operation. This reference document assumes no responsibility for any issues arising from failure to follow the manufacturer's instructions.Read More
October 20, 2025
Technical measures to ensure construction quality of concrete laser leveling machines under extreme weather conditions such as high and low temperatures
For the technical measures to ensure the construction quality of concrete laser leveling machines under extreme weather conditions such as high and low temperatures, we need to carry out systematic control from five aspects: "people, machines, materials, methods and environment". laser leveling machines are the core equipment for achieving high-precision ground surfaces, but extreme weather can seriously affect the performance of concrete itself, ultimately impacting the construction quality. The following is a detailed technical measure plan High temperatures can cause rapid evaporation of concrete moisture, significant loss of slump, shortened setting time, and easily lead to problems such as plastic shrinkage cracks and surface powdering, posing challenges to the construction efficiency of laser levelings and the quality of the ground. 1. Concrete mix proportion and material control Adjust the mix ratio: Communicate with the mixing plant in advance to use retarding water-reducing agents or high-efficiency retarders to delay the setting time of the concrete and create a longer operation window for leveling. Reduce the mold entry temperature Shade and cover the aggregates (sand, stone) or spray water to cool them down to avoid direct sunlight. Mix with cold water or ice to lower the temperature of the mixing water. When necessary, sprinkle water on the surface of the cement tanker to cool it down. Control slump: Strictly monitor the slump of the concrete arriving at the site to avoid it being too large (prone to bleeding and significant shrinkage) or too small (difficult to level). Slump loss is rapid at high temperatures, so it is necessary to ensure that the concrete has good workability. 2. Construction process control Arrange the operation time reasonably: Try to avoid pouring operations during the hottest period of the day (such as from 10 a.m. to 4 p.m.), and choose to carry out construction in the morning and evening when the temperature is lower. Accelerate transportation and pouring: Plan the transportation route well to ensure that the time from the concrete leaving the machine to the completion of pouring is the shortest. On-site dispatching should be efficient, ensuring that "vehicles wait for jobs" rather than "jobs wait for vehicles". Adequate preparation and rapid construction: Before pouring the concrete, ensure that everything such as formwork, steel bars, and laser leveling machines is in place. After the concrete arrives, immediately organize pouring, spreading and leveling to shorten the exposure time. 3. Key points for Operating a laser leveling Improving leveling efficiency: The laser leveling should maintain continuous and uniform operation, taking advantage of its high efficiency to complete the leveling work before the initial setting of the concrete. Prevent rapid evaporation of moisture: After the scraper of the leveling machine is applied, personnel can be immediately arranged to spray curing agent or cover it with plastic film for "covering as needed". This is a very effective measure to prevent surface plastic cracks. 4. Early maintenance Timely maintenance: After the leveling is completed, maintenance should be carried out immediately. Do not wait until the concrete has completely hardened before curing. Moisture retention curing: Cover with wet gunny bags or straw curtains and continuously sprinkle water, or use water retention curing, covering with curing film and other methods to ensure that the concrete surface remains moist for at least 7 days. Low temperatures can delay the hydration of cement. When the temperature drops below 0℃, the free water inside the concrete freezes, generating ice expansion stress, which damages the concrete structure and leads to permanent loss of strength. When using a laser leveling for construction at low temperatures, the key is to ensure that the concrete is not damaged by freezing and to create a normal environment for its strength growth. 1. Concrete mix proportion and material control Adjust the mix ratio: Use early-strength cement or add early-strength agents and antifreeze agents to accelerate the early strength development of concrete and enhance its frost resistance. Increase the mold entry temperature Heat the aggregates (sand, stone) to prevent caking and the presence of ice chips. Heat the mixing water (generally not exceeding 60℃). Ensure that the temperature of the concrete leaving the machine and entering the mold comply with the specification requirements (generally, the temperature leaving the machine should not be lower than 10℃ and the temperature entering the mold should not be lower than 5℃). 2. Construction Environment and Maintenance Control (Heat Storage Method and External Heating Method) Build an insulated greenhouse: Set up a temporary insulated greenhouse in the construction area, and use heating methods such as warm air fans and steam pipes inside to maintain the environmental temperature above 5℃. This is the most reliable method. Heat storage maintenance method: This method can be adopted when the average outdoor temperature is not lower than -5℃. After the pouring is completed, immediately cover the concrete surface closely with insulation materials (such as rock wool quilts, plastic films with straw curtains, etc.), and utilize the heat of hydration of cement and the initial heat of the concrete to make it reach the critical strength in a positive temperature environment. Heating maintenance method: When the temperature is extremely low, an external heat source should be used. Warm air blower hot air method: Blowing hot air in a closed space. Electric blanket covering method: Cover the concrete surface with a special electric heating curing blanket. Note: It is strictly prohibited to directly bake the concrete surface with an open flame, as this will cause rapid water loss and carbonization. 3. Operation and construction management of laser leveling machines Base layer and preparation: Before pouring, it is necessary to remove ice, snow and frozen blocks from the formwork and base layer. It is strictly prohibited to pour concrete on the frozen base. Rapid construction: Similar to high-temperature weather, it is necessary to organize tightly to reduce heat loss during the transportation and pouring of concrete. The leveling machine should operate efficiently and be immediately covered and insulated after completion. Temperature monitoring: Temperature measurement points are set up at different parts within the concrete structure to monitor temperature changes at regular intervals, ensuring that the internal temperature of the concrete reaches the "critical strength for freezing" (typically 30% of the designed strength or 5MPa) before dropping to 0℃. No matter what extreme weather conditions it is, the stability and accuracy of the equipment itself are the prerequisites for ensuring quality. Equipment calibration and inspection Before starting work every day, the accuracy of the laser transmitter and the receiver of the leveling machine must be checked and calibrated. Inspect key components such as the hydraulic system, engine, and scraper base plate to ensure there are no faults. At extreme temperatures, the viscosity of hydraulic oil will change, and the corresponding grade of hydraulic oil should be used. Equipment adaptability High temperature: Pay attention to the heat dissipation of the equipment and prevent the hydraulic system from overheating. It is advisable to consider installing sunshade devices at key parts of the equipment. Low temperature: Equipment (especially diesel engines) may have difficulty starting. Low-temperature grade diesel should be used, and the engine should be preheated if necessary. At low temperatures, the brittleness of metal parts in the equipment increases. Operation should be smooth and avoid severe impacts. Power supply guarantee: Ensure the power supply of the laser emitter is stable to prevent the leveling from being interrupted due to power failure, which may cause cold joints during construction. Control dimension Core measures for high-temperature weather Core measures for low-temperature weather Concrete material Retarder, reducing mold entry temperature Early strength agent/antifreeze, increase mold entry temperature Construction process Avoid high-temperature periods and carry out rapid and continuous construction Rapid construction and ice and snow removal Leveling operation High-efficiency leveling and immediate application High-efficiency leveling and immediate insulation Maintenance measures Moisturizing is key (watering, covering) Insulation is key (covering, heating) Environmental control Shading and wind protection Build an insulated shed and heat it up The core idea: The laser leveling is a tool for achieving high flatness, but the quality of the concrete itself is the foundation. In extreme weather conditions, all technical measures should be formulated around the central goal of "creating a favorable environment for the normal hydration and hardening of concrete". Only through material adjustment, process optimization and meticulous maintenance, combined with the efficient and precise operation of the laser leveling, can the construction quality be ultimately guaranteed. Note: The parameters provided in this document are for reference only and are not mandatory. Due to differences in technical characteristics between different brands and models of laser levelers, please consult the manufacturer for a suitable solution before actual operation. This reference document assumes no responsibility for any issues arising from failure to follow the manufacturer's instructions.Read More