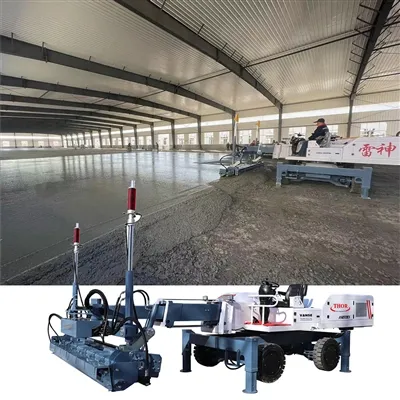
Technical Knowledge
What is the importance of a test run before using a concrete laser leveling?

Compared with the laser leveling / leveling machine, the trial run process is an experimental process before it is officially put into use, and only the equipment that has been successfully tested can be officially put into use. It can be seen that in the process of using the laser leveler, the test run is a very important step. In order to help everyone realize the necessity of this step, the following article mainly introduces the importance of the test run process before using the laser leveling.
1. Clean the laser leveling machine, the surface of each component, and check whether all joints are firmly fastened.
2. All lubricating parts of the laser leveling machine are filled with oil, check whether the electrical system is intact, whether the limit switch is set correctly, whether the connection is reliable, no-load test, and the lifting motor is lifted and lowered no less than 10 times, requiring flexible transmission and high precision , stop, the resistance of the main drive is stable, and the sound is normal. After the empty car is put into trial operation, a load test is carried out.
3. Adjust the position of the frame according to the width of the corrected I-beam flange plate, and adjust the correct position of the guide rod according to the thickness of the plate.
4. Start by the power supply, start the laser leveling / leveling machine to run dry, ensure the normal operation of the parts and components of each transmission part, no cassette tape, no overheating, load can be loaded, and the welded H-beam is suspended on the roller table by a row crane superior.
5. Start the drive roller to transport the steel into the laser leveler/ leveling machine. This end exceeds the frame leveler, and this end stops after exceeding the center of the correction wheel by about 150mm. Press the upper roller to reduce the linkage. When the upper roller touches the workpiece Immediately stop, and then press the upper and lower pressure rollers, the pressure may have errors, and can be adjusted at any time.
6. Correctly adjust the amount of depression during the test run of the laser leveling / leveling machine. The dial of the screw rod is indicated as 0.5mm per grid, and the amount of over-deformation under pressure must not exceed 1mm. However, the adjustment of the upper pressure roller can only be done during the stop process. Carried out, the output of the workpiece is about 200mm, and the flange plate after the initial correction is perpendicular to the web to prevent over-correction.
7. If it is necessary to adjust the correction amount, retract the workpiece into the main unit (the end is about 150mm from the center of the correction wheel) to adjust the shrinkage of the correction roller, start the main drive motor, and perform normal correction output. If multiple corrections are required on one side, the workpiece should be stopped immediately after the end of the workpiece is about 100mm from the center of the correction wheel, and the workpiece should return to the front end of the front end about 150mm beyond the center of the correction wheel.
The above article is all the content introduced by the manufacturer about the importance of the test run process before using the laser leveling machine. Do you understand it? If you feel interested in our products after reading the article, you can call us for details, thank you for your reading and support.
Thanks to All the Friends Who Support and Trust Shandong Vanse Machinery Technology Co., Ltd.
If you want to know more about Shandong Vanse Machinery Technology Co., Ltd. or have any questions, please feel free to contact us:
Our Factory
Shandong Vanse Machinery Technology Co., Ltd.








Share this article

About the Author: Shandong Vanse Machinery Technology Co., Ltd.
Shandong Vanse Machinery Technology Co., Ltd. is a high-tech manufacturer specializing in concrete construction machinery, including laser screeds and related equipment. The company integrates R&D, production, and global sales, with products exported to over 60 countries and widely used in infrastructure projects worldwide.
Previous Post
Next Post
Related Articles
You Might Also Like
Tips to extend laser leveling laser emitter life? Let’s share!
Laser emitters are the "brain" of your operation, and they aren't cheap. In the harsh environment of a concrete pour-filled with dust, moisture, vibration, and lime-they take a beating. Here are the best ways to keep your transmitter running with ±3mm accuracy for years instead of months: Vibration is the #1 killer of internal self-leveling pendulums and spinning diodes. Tripod Placement: Never set your tripod directly on a slab where the laser leveling or a vibrating truss is running. The micro-vibrations can wear out the internal motor bearings. Subgrade Stability: If you must set up on dirt, use a "tripod stabilizer" or sink three rebar pins into the ground and set the tripod legs on those to prevent settling during the pour. Concrete dust is highly abrasive and slightly alkaline. It eats through lens coatings. The Microfiber Only Rule: Never wipe a dry laser lens with your shirt or a paper towel. It's like using sandpaper. Cleaning Routine: Use compressed air (canned air is best) to blow off grit, then use a specialized camera lens cleaner and a fresh microfiber cloth. Shielding: If you are working in a windy, dusty warehouse, consider a "wind shield" (a clear acrylic housing) for the transmitter, provided it's optically rated so it doesn't refract the beam. Laser diodes are sensitive to temperature shifts. Acclimatization: If you transport your laser in a heated truck cab and then set it up in a 2℃(35℉) warehouse, the internal components will contract, and you might get "fogging" inside the glass. The "Slow Warm-up": Let the laser sit in its (closed) case in the work environment for 15 minutes before turning it on. Most modern emitters use Li-ion or NiMH packs. Don't "Cook" the Battery: Avoid leaving the transmitter on a charger for days at a time once it's full. Storage: If the machine is going to sit for more than two weeks, remove the batteries. Leaking alkaline batteries are a common cause of "totaled" transmitters. The internal leveling gimbals are designed to be upright. Case Orientation: Always store and transport the laser in its hardshell case, and ensure the case is secured upright in the vehicle. The "Seatbelt" Treatment: Don't let the laser case bounce around in the bed of a pickup truck. Put it in the cab, strapped down. Task Daily Monthly Lens Cleaning Blow off dust Use optical-grade solution Calibration Quick benchmark check Full "Two-Peg" field test Connections Check for moisture Clean battery contacts with ISO Storage Dry off any condensation Inspect case seals/latches Pro Tip: Keep a logbook in the laser case. Note the date of the last calibration and who did it. If your FF/FL numbers start to dip, you'll have a paper trail to see if the laser is drifting over time. Would you like a Step-by-Step Field Calibration Guide (the "Two-Peg Test") to help your crew verify the emitter's accuracy on-site? Contact us NOW Note: The parameters provided in this document are for reference only and are not mandatory. Due to differences in technical characteristics between different brands and models of laser levelers, please consult the manufacturer for a suitable solution before actual operation. This reference document assumes no responsibility for any issues arising from failure to follow the manufacturer's instructions.How should the emery floor be maintained before and after construction?
Emery floor is widely used in industrial plants, parking lots, warehouses and other places due to its high wear resistance, high strength, anti-slip and beautiful appearance. However, in order for the emery floor to achieve the expected use effect and life, in addition to high-quality materials and scientific construction technology, maintenance work before and after construction is also crucial. This article will conduct an in-depth discussion on the maintenance of diamond floor before and after construction, in order to provide valuable reference for relevant practitioners. 1. Foundation treatment before construction The foundation treatment before the construction of diamond floor is a key step to ensure the quality and service life of the floor. First, the base floor should be thoroughly cleaned to remove oil, dust, debris, etc., to ensure that the surface of the base is dry, flat and free of slurry. Secondly, the strength and density of the base should be checked. If there are defects such as cracks and potholes, they should be repaired and leveled in time. In addition, for the newly poured concrete base, the diamond floor should be fully maintained to sufficient strength before the construction of diamond floor. During the foundation treatment process, the following points should also be noted: First, ensure that the bonding performance between the base layer and the diamond floor material is good to avoid problems such as delamination and sanding; second, control the moisture content of the base layer to avoid excessive or low moisture content affecting the quality of the floor; third, for special base layers, such as renovation of old floors, appropriate treatment plans should be formulated according to specific circumstances. 2. Preparation of construction materials The construction materials of diamond floor mainly include diamond aggregate, cementitious materials, additives, etc. During the material preparation stage, it should be ensured that the selected materials meet the design requirements and have good wear resistance, compression resistance, anti-slip properties, etc. At the same time, strict quality inspections should be carried out on the materials to ensure that there are no impurities, no lumps, no expiration, etc. During the transportation and storage of materials, attention should be paid to moisture-proof, sun-proof, and anti-pollution measures to prevent the materials from being damp, lumped or polluted and affecting the use effect. In addition, during the material mixing process, the water-cement ratio and mixing time should be strictly controlled to ensure the uniformity and fluidity of the mixture. 3. Construction process control The construction process of diamond floor includes primer construction, diamond aggregate laying, compaction, maintenance and other steps. During the construction process, the construction specifications and process flow should be strictly followed to ensure quality control of each link. First, the primer construction should be uniform and without omission to enhance the adhesion between the base and the diamond floor. Secondly, when laying diamond aggregate, the laying thickness and uniformity should be controlled to avoid uneven thickness or hollowing. At the same time, compaction should be carried out in time after laying to improve the density and strength of the floor. Finally, during the maintenance stage, the maintenance time and method should be reasonably controlled according to the ambient temperature and humidity conditions to ensure that the floor is fully hardened and dried. 4. Initial maintenance and protection After the construction of diamond floor is completed, initial maintenance is an important link to ensure the quality of the floor and extend its service life. During the maintenance period, heavy objects should be avoided from rolling on the floor or scratching with sharp objects to avoid damage to the floor. At the same time, the floor surface should be kept clean and dry to prevent moisture and dirt from penetrating and affecting the quality of the floor. In the initial maintenance stage, some measures can also be taken to improve the performance and aesthetics of the floor. For example, applying a layer of transparent or colored coating on the floor surface can increase the gloss and wear resistance of the floor; setting angle steel or corner guard strips on the edge of the floor can prevent damage caused by the impact of equipment such as forklifts. 5. Long-term maintenance and care The long-term maintenance and care of diamond sand floor is the key to ensuring its performance and service life. In daily use, the floor surface should be cleaned regularly to remove oil, dust and other debris to keep the floor clean and beautiful. At the same time, avoid using corrosive substances such as strong acids and alkalis to clean the floor to avoid damage to the floor. For floor areas with wear, scratches and other problems, they should be repaired and renovated in time. When repairing, the repair material compatible with the original floor material should be selected, and the operation should be carried out in accordance with the construction specifications to ensure the quality of the repair. In addition, according to the use and wear of the floor, the overall renovation can be carried out regularly to restore the performance and aesthetics of the floor. 6. Problem Solving and Prevention During the use of diamond sand floor, some problems may occur, such as delamination, sanding, cracking, etc. For these problems, the causes should be analyzed in time and corresponding solutions should be taken. For example, for delamination problems, it may be caused by improper base treatment or poor material quality. Therefore, the base treatment and material quality control should be strengthened; for cracking problems, it may be caused by improper construction or changes in ambient temperature. Therefore, the construction process should be optimized and the ambient temperature should be controlled. At the same time, in order to prevent the occurrence of problems, daily inspections and maintenance should be strengthened. During inspections, attention should be paid to changes in the flatness, glossiness, wear resistance, etc. of the floor, and potential problems should be discovered and dealt with in a timely manner. During maintenance, a reasonable maintenance plan should be formulated according to the use and wear of the floor, and regular cleaning, repairs and renovations should be carried out. 7. Summary and Precautions In summary, the maintenance work before and after the construction of diamond sand floor is of great significance to ensure the quality and service life of the floor. In actual operation, attention should be paid to the basic treatment before construction, the preparation of construction materials and the control of construction process to ensure the quality of construction; at the same time, it is necessary to strengthen the initial maintenance and long-term maintenance and maintenance work, and timely discover and deal with problems; finally, through the implementation of problem solving and preventive measures, ensure that the diamond floor always maintains good performance and appearance. It should be noted that when carrying out the maintenance of diamond floor, relevant specifications and safety requirements should be followed to ensure the safety of operators. In addition, a reasonable maintenance plan should be formulated according to the specific use environment and requirements to ensure that the diamond floor can meet the needs of long-term use. When summarizing the key points of maintenance before and after the construction of diamond floor, we can summarize the following points: First, ensure that the base is properly treated, which is the basis for ensuring the quality of the floor. The flatness, strength, moisture content and other indicators of the base must meet the construction requirements, otherwise it will have an adverse effect on the subsequent use of the floor. Secondly, pay attention to the selection and quality control of materials. High-quality materials are the key to ensuring the performance and service life of the floor. When selecting materials, full consideration should be given to performance indicators such as wear resistance, compression resistance, and anti-slip properties, and the supplier should be ensured to have a good reputation and stable supply capacity. Furthermore, the control of the construction process is also crucial. During the construction process, operations should be carried out strictly in accordance with the construction specifications and process flow to ensure quality control at each link. In particular, the compaction and maintenance links are of great significance for improving the density and strength of the floor. In addition, daily maintenance and care work should not be ignored. Regular cleaning, inspection of the wear of the floor, and timely repair and renovation can effectively extend the service life of the floor. At the same time, the use of corrosive substances such as strong acids and alkalis to clean the floor should be avoided to avoid damage to the floor. Finally, it is equally important to prevent the occurrence of problems. By strengthening daily inspections, optimizing construction processes, and controlling ambient temperature, potential problems can be discovered and dealt with in a timely manner to avoid the expansion and deterioration of problems. To sum up, the maintenance work of diamond abrasive floor before and after construction is a systematic and complex task, which requires comprehensive consideration of multiple factors. By strengthening the work in grassroots treatment, material selection, construction process control, daily maintenance and care, as well as problem prevention, the quality and service life of diamond abrasive floor can be guaranteed to the greatest extent.How to ensure flatness during concrete pavement paving?
In the process of concrete pavement paving, ensuring the flatness requires multiple aspects such as the selection and adjustment of the paver, paving operation control, and auxiliary measures during the construction process, as follows: 🌻Select a suitable paver: According to the width, thickness, construction progress and other requirements of the concrete pavement, select a paver with good performance and high paving accuracy. Large pavers have a larger paving width and stronger vibration capacity, which is suitable for large-area pavement paving; small pavers are flexible and suitable for narrow sections or local repairs. At the same time, the degree of automation of the paver should be considered. A paver with automatic leveling, automatic adjustment and other functions can better ensure the flatness of the road surface. 🌻Adjust paver parameters: Before paving, the parameters of the paver need to be carefully adjusted. The elevation angle of the leveling plate should be adjusted according to the consistency and paving thickness of the concrete, generally between 1.5° – 3°, to ensure that the concrete can be evenly spread under the leveling plate. The vibration frequency and amplitude should also be selected according to the characteristics of concrete. Usually, the vibration frequency is 3000-6000 times/minute and the amplitude is 0.3-0.8mm, so that the concrete can be fully vibrated and compacted, while avoiding over-vibration and concrete segregation. 🌻Check and calibrate the leveling system: The leveling system of the paver is a key device to ensure the flatness of the road surface. Before construction, check whether the sensors, controllers and other components of the leveling system are working properly, and calibrate and debug them. The paver can be automatically leveled by placing standard pads at different positions, and check whether the height change of the ironing plate meets the requirements. The error should be controlled within ±1mm. 🌻Maintain uniform paving speed: The paver should maintain a uniform speed during the paving process, and the speed is generally controlled at 2-3m/min. Too fast speed will cause the concrete to not have time to vibrate and level, affecting the flatness; too slow speed will cause the concrete to accumulate in front of the paver, increasing the difficulty of paving. At the same time, try to avoid the paver to stop midway. If it needs to stop in special circumstances, the time should be controlled within 30 minutes. Otherwise, the paved concrete should be handled in time to prevent its solidification from affecting the flatness. 🌻Control paving thickness: Before paving, the paving thickness of the paver should be determined according to the design thickness of the pavement and the loose paving coefficient. The loose paving coefficient is generally between 1.1 and 1.3, and the accurate value can be determined by trial paving. During the paving process, use thickness sensors or manual detection methods to monitor the paving thickness in real time to ensure that the thickness deviation is within ±5mm. 🌻Ensure uniform feeding: The supply of concrete should be continuous and uniform to avoid insufficient or excessive feeding. The concrete in the hopper should maintain a certain height, generally not less than 1/3 of the hopper height, to ensure that the paver spiral distributor can evenly distribute the concrete over the paving width. At the same time, pay attention to the change in the slump of the concrete. If the slump changes significantly, the parameters of the paver should be adjusted in time or the concrete should be treated to ensure the paving quality. 🌻Setting baseline: Before paving, baselines should be set along both sides of the road surface to provide accurate elevation and plane benchmarks for the paver. The baseline can be made of steel wire or aluminum alloy rails. The tension of the steel wire should be no less than 800N. A support point should be set every 5-10m to ensure the flatness and stability of the baseline. When using aluminum alloy rails, the installation accuracy of the rails should be guaranteed, and the straightness deviation should not exceed ±2mm/m. 🌻Arrange special personnel for assistance: Arrange special personnel behind the paver to assist in the operation and promptly deal with local unevenness, lack of material or excess material after the paver paving. For local low-lying areas, concrete can be used to fill them and vibrate them with a vibrator; for local high parts, shovels and other tools can be used to remove and trim them. At the same time, pay attention to trimming the concrete on both sides of the paver so that it fits tightly with the template or curbstone to ensure the flatness of the edge of the road surface. 🌻Strengthen quality inspection: During the paving process, the inspection of the road surface flatness should be strengthened. You can use a 3m ruler or a flatness meter to conduct real-time inspection. Inspect a point every 10-20m. If the flatness deviation exceeds the allowable value (generally ±5mm), analyze the cause and make adjustments in time. Mark the uneven parts detected so that they can be processed before the initial setting of the concrete. Click the below to jump immediately!!! ARMOUR JOINT LASER LEVELING MACHINE LIGHT TOWER POWER TROWEL SLIPFORM MACHINE STEEL FIBER TOPPING SPREADER TRACKED MINI DUMPER